5:33 PM Edit This 0 Comments »
Wow - time has been flying by!  There's only 32 days left 'til Christmas! To help you get a jump on your gift giving, or to simply save for yourself - SU! having a spectacular sale for 9 days only!  50% OFF My Digital Studio, Fabric and more!  Lots of dies and stamp sets to choose from at a big discount too!  You HAVE to check this out!  The Holiday Bundles are still on sale too! Go to my website (http://www.dbstamps.stampinup.net/)  and click on Promotions for all the details.
In the meantime, I'd like to wish you all a Happy Thanksgiving!

Favorite Halloween swaps

2:45 PM Edit This 0 Comments »
I received a lot of great swaps in Baltimore.  I'd like to share some of my favorites with you.  These are my two favorite Halloween ones.  Unfortunately I can't tell you who made them as they didn't have any info on them!  Imagine doing such nice work and not putting your name on it.  Well, thank you if the artists happen to stop by here.  : )

Can you see the spiderweb embossing on both of them?
Love that, the bat punch, the glittery spider, brayering - all such fun!

Baltimore Regional

8:29 PM Edit This 0 Comments »
Here's a bunch of RemARKable Stampers at the Baltimore Regional.  We had a blast.  I got a lot of great swap cards and took over 100 pictures of the sample boards.  I love the "Workshop Wows" and other projects that Stampin' Up! demonstrated for us. They also gave us a stamp set and five make n take projects for it.  What a fun day!  I enjoyed it so much I'm planning on bringing a mini version of it to you, so if you're near Plymouth Meeting, PA, I'd love to have you join me.  I would also love to have you join me at these type of events.  If you sign up with me between now and Oct. 17th, I can offer you a new, yet to be unveiled stamp set, Eat Chocolate (stinkin cute!) as well as the gorgeous Greenhouse Gala Craft Tote FREE!  I wish I could sign up again - this is an awesome offer.  I have seen this tote in person and I so want one, but I can't get it - only new recruits can!  Here are some samples with Eat chocolate.  I'll be posting some of my favorite swaps soon too - so come back for that.

Enjoy!

RemARKable Holiday Madness Blog Tour - # 7

10:00 PM Edit This 0 Comments »
Wow, last day of the tour already.  I hope you've enjoyed seeing all the wonderful holiday ideas.  I know I got a few more ideas to try. 
Did you know Stampin' Up! has a jewlery line?  It's called Simply Adorned.  We have a bracelet and two different lengths of chains, as well as four different sizes of charms.  There are even new baubles in the Holiday Mini that hook on to the chains.  All of the charms are locket style to hold whatever you'd like - pictures, dried flowers, and best of all - stamped images!  This means you can stamp initials or anything else you'd like.  You can make inserts for every holiday or even every day.  I've seen people weave ribbon through the chain to get a different look too.  Here I just tied a little bow for an extra touch. These make wonderful gifts and are a great way to wear some art.
I'm thinking I'll probably wear mine at the Baltimore Regional, where I'm sure to gets tons more ideas to share with you, so I hope you'll come back and visit me often.  Enjoy!

RemARKable Holiday Madness Blog Tour # 6

10:00 PM Edit This 1 Comment »
Hello!  I have another card for you today.  This one uses some of my favorite things - stamps that coordinate with punches and embossing folders.  Stamp set is Perfect Punches and I markered the stamp so I could get both real red and old olive on it. It coordinates with the 1 3/4" scallop punch and then we have an even bigger scallop punch - 2 3/8!  The embossing folder is Petals a Plenty and I simply used the thin side of my stampin write marker in real red to make the dots in the center.  Old olive ribbon wraps it up!

RemARKable Holiday Madness Blog Tour - Post 5

10:00 PM Edit This 4 Comments »
Welcome back to the tour.  There are some awesome ideas here so make sure you check them all out.
Today's project is a list pad.  We made a different version of these at my last stamp camp where we actually stamped images on the front.  This time I used the Deck the Halls Designer Paper and it was so pretty I just couldn't cover it up. I layered the piece on always Artichoke and then the holder is Cherry Cobbler.  The ribbon is the new seam binding in the Holiday Mini and it's so soft and flexible!  I was going to use DSP on the pen holder but then decided to to put it inside the pen.  Inside is half of a Jr. legal pad that Staples cut for me. These are great for lists for the grocery store, daily to do's, countdown to Christmas chores, wish lists, teacher gifts, etc. etc...


RemARKable Holiday Madness Blog Tour - # 4

10:00 PM Edit This 2 Comments »
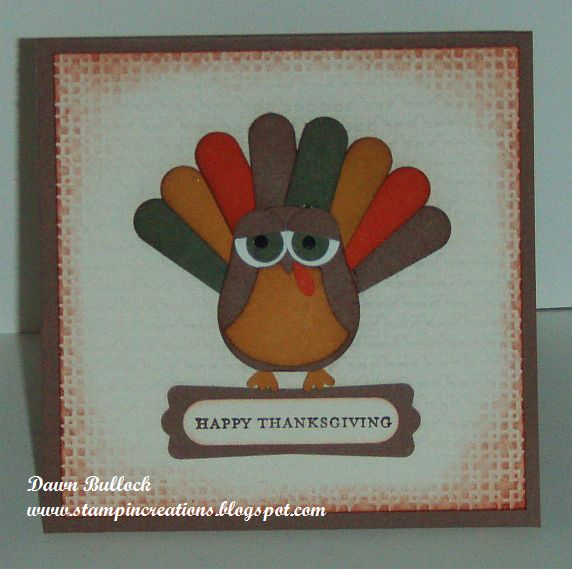
Have you seen My Digital Studio by Stampin' Up! ?  At first I wasn't interested in it, but then I kept seeing some really neat things people were using it for.  If you're like me (and most people these days) and have your camera card full of pictures or have a bunch saved on your computer and haven't gotten them all printed yet, or simply don't have much time, My Digital Studio would be wonderful for you.  It's incredibly easy and has options for those who don't want to put much "thinking" into it to the totally customizable computer savvy techie. I whipped up a few samples to show you:
This first card is actually one that is already designed and I did Nothing - just selected it!


This one I selected a premade layout and inserted a picture, selected the background paper, punch, and "stamp".  Oh - did you notice the brads on the ends of the punch?  Put them there too.  Done in about 3 minutes.


For the third one, I started with a blank card and added all of my elements. Even starting from scratch it didn't take very long.  Scrapbooking is tons faster with this.You can print your projects, save them to a disk and email them. You can choose sizes, embellishments, borders, stamps... There really is a lot you can do with this program, and there's no mess to clean up afterwards : ).  You can even add music and make a slide show, add hyperlinks and much more.  It's definitely worth checking out!!

RemARKable Holiday Madness Blog Tour - Day 3

10:00 PM Edit This 2 Comments »
Hello!  The third idea I have for you on this tour  is made with aluminum sheets (hardware store), the Snowflake #2 die with the Big Shot, a votive candle, and our new Stampin' Glitter in Silver Glass from the Holiday Mini.  I cut 2 snowflakes out of the aluminum and bent one around a little votive candle so it would fit in the center.  Adhere the snowflakes together with glue dots.  What really makes this special is the chunky glitter around the outside of the votive - it's not like any other glitter I've seen.  I love it!  Makes quite a difference, don't you think?  Anyway, this would make a nice little gift or look fabulous on your table.  Let me know what you think - I love hearing your comments!


RemARKable Holiday Madness Blog Tour - Day 2

10:00 PM Edit This 4 Comments »
Welcome back to the tour!  Thank you for visiting me - I hope you're enjoying all the great ideas we have to share.  Today I have an ornament that's fun to make.  It takes 12 quarter inch strips of paper, preferrably with different sides, six inches long.  I used the Deck the Halls designer paper in the Holiday Mini Catalog - love this paper!

This would be great as a package topper as well and the size can be adjusted.  Want to know how to make it?  Of course you do - here goes:
Weave 6 strips and glue down as shown and repeat with remaining 6 strips.  Adhere the tips of the top left and left top around the back to make a loop.  Repeat on other sides.  Once you have two of the lower right image you'll rotate one and put them together back to back - or front to back, whatever way you prefer.  Weave straight ends through and glue to connect.  Trim off anything that sticks out.  You're done!  I did add a little extra to mine, though.  I sprayed it all over with Frost White Shimer Paint mixed with alcohol.  Smooch spritz would look great too.  Pretty!

RemARKable Holiday Madness Blog Tour

10:00 PM Edit This 3 Comments »
Welcome to the Remarkables Holiday Blog Tour!
I am sure you'll enjoy all the great ideas we have in store for you - all week long!
I'm going to start with a card.  I love to send and recieve Christmas cards.  Sometimes it's the only time of the year I hear from people - maybe even get a photo, so I always look forward to that.  Here's one I did with the Christmas Postcard stamp in the Holiday Mini.  I colored it in with a blender pen and the following inks:  Cherry Cobbler, Always Artichoke, So Saffron, and Garden Green.  It's layered on a Top Note Die cut in Cherry Cobbler and then layered on an embossed Always Artichoke base (Vintage Wallpaper embossing folder).  This is a great card for mass producing and mailing, since it is "flat".  I love these colors together and most of you know I love my Big Shot, so I'm happy to die cut and emboss. Hope you like it too!


Halloween Treats

4:16 PM Edit This 3 Comments »
Aren't these cute?  I figured I better show you something for Halloween before all the Christmas stuff.  I'm participating in a Holiday Blog Hop starting the 26th - so make sure to come back for that.
In the meantime, these are 1X8 clear bags filled with M&M's and an easy topper.  Batty for You is a great set to layer with punches and super fast.  Order your set now to get ready for your trick or treaters. : )

Friends Never Fade

4:40 PM Edit This 3 Comments »
Here's my favorite card from stamp camp last night.  There's so many great ways to use this set with the coordinating Greenhouse Gala Designer paper.  Love the colors too - new Daffodil Delight, Pear Pizzazz, Real Red, Choc. Chip.

Happy New School Year!

12:44 PM Edit This 0 Comments »
I hope everyone had a great summer.  I did, but with the kids undertoe 24/7, it didn't give me a lot of time to do my own thing and stamp.  I'm getting back in the swing and saw a card I just had to CASE on the demo website by Doris Denman.  I had just come up with 4 cards with the Friends Never Fade set for my class Friday night and then I saw this great idea with a great color combo (from the awesome new Color Coach!).
As usual, it looks better in person, but isn't it striking?  The colors are Concord Crush, Melon Mambo and Pear Pizzazz.  The flower is embossed and cut out on shimmer paper and colored with the blender pen , then attached on top of the stamped image.  The cute little flowers under the image are from the Hostess Set Because I Care.  So pretty!

Owl Punch and New Ribbon!

4:12 PM Edit This 0 Comments »
Hello!  Sorry it's been a while, life is busy!  I wanted to share this card with you since I really like how it turned out.  It uses a lot of new items  - new Owl Punch (a must have!), Cherry Cobbler card stock, Love Letter DSP (vest), Crochet Trim and 1/8" taffeta ribbon.  Isn't it cute? Actually the only stamping on it is the hello that I just markered from the hello baby stamp in Teeny Tiny Wishes.  Enjoy!

Tropical Party and Island Oasis

9:30 PM Edit This 1 Comment »
I love the set Tropical Party and Designer paper Island Oasis from the Summer Mini.  I've created a bunch of cards with it and have even designed a class for it!  Now this says summer!
This is a great all occasion set to have or even to give as a gift! 
Come join me on Friday, August 6th to make a designer box, 4 different cards and envelopes for $14.  This is also available as a kit to go - just add shipping.  Order the stamp set and get 10% off!

Elements of Style in a Barrel

4:19 PM Edit This 2 Comments »
I saw this idea from Carole'Ann S. (I believe) and loved it.  Now, it does involve some cutting, but isn't worth it?  Such a totally different look for this set.  Barrel is made from a bunch of window word punches and flowers are colored in and placed on top of Inspired by Nature grass.  So glad both sets are going to be in the new catalog!

10:24 PM Edit This 0 Comments »
Happy unofficial start of summer!  (School's Out!)
This is a banner I made my daughter's teacher for her baby shower at school.  It's all Stampin Up!  The Big shot came in super handy for this one - they're all dies and held together with jumbo brads. (It said Welcome Baby)This is a card I really like from my last stamp camp.  The Textured Impressions Embossing Folder in the Summer Mini is fabulous!  So is the $8.95 Happy Grad stamp - you could also just marker up the Happy Graduation and stamp the rest inside - which is what Kelly did and it looked great too!  The star punches make it pop.

Elements of Style

3:17 PM Edit This 0 Comments »
The following cards all use the new Elements of Style stamp set from Stampin' Up!'s Summer Mini Catalog.  We made the first two at stamp camp last Friday and the third is my simplied version of a card by Ann Schach.  The bottom didn't photograph so well because I sprayed shimmer mist all over the inside panel.  It's all shimmery and gorgeous in real life!  It also uses the new Stampin' Up! Square Lattice embossing folder - love it! 

Chalkboards!

10:56 AM Edit This 0 Comments »
This was one of my favorite projects from my stamping weekend.  Did you know Stampin' Up! carries Chalboard Vinyl?  and you can cut through your Bigshot?  Ohhh, the possibilities!  I added some Sweet Pea DSP, Fluerettes (that I dyed with ink), and Designer Buttons.
  I also covered the back with some gorgeous DSP from Nouveau Chic and black ribon.

And here are some others to inspire you from the meeting.
Aren't these great?

Ornament Punch Ideas Display

10:07 PM Edit This 0 Comments »
Hi!  I had a great time away last weekend stamping and chatting and creating lots of fun things.  I'll post some of those things later, but for now, here are are few more of the samples I made with Stampin' Up!'s Ornament Punch.  It can be used for so much! 
First, who doesn't love those guys in brown delivering packages? (the ornament is his face!)
Next is a fabulous vase - which showed up super shimmery here since I used the shimmer Paint on it.  Then we have a cookie jar!  Mmm, chocolate chips!  And last one for now, and Easter bunny!  There are lots of animals that you can do, but this seemed fitting for now.  Have a wonderful Easter everyone!

Ornament Punch Fish

7:31 AM Edit This 1 Comment »
This is one of my display ideas for my team meeting today.  I came up with 8 different cards, a 12 X 12 scrapbook page and a 3D item all using the ornament punch in some way.  I'll share more later, as I'm sure I will gettting lots and lots of fabulous ideas there.
Oh no!  There's no stamping on this one!  Lots of punches though:  Ornament punch, scalloped oval punch, half inch circle punch, 1/4 inch circle punch, Swirly sizzlet die.

Tote-ally Tess

1:03 PM Edit This 1 Comment »
Here's a quick card I made with the adorable Tess in the Mini Catalog.  I'm really hoping she makes it to the big catalog as I've just discovered how fun this set can be!  Lots of great stamping stamps in there too!  Unfortuantely I forgot to take a picture of a thank you card I sent out that had almost every stamp in the set on it, so I'll have to make another.  Tess is colored in with markers and her pants are paper pieced.  Fun!

RemARKable Going Green Blog Tour - Post 3

10:03 PM Edit This 1 Comment »
Welcome back!  Here's my third project idea following the "going green" theme.  You know those tissue boxes, cereal boxes, etc. that you usually toss or cut for the Box Tops?  Not only are they recyclable but they are reusable!  You could simply cover them with designer series paper for a gift box or use parts of them.  They make a great backing for anything that needs a little more strength. The tissue box I used is thin enough to use punches with.  The Big Shot would cut through them easily as well, but here's a super quick and easy craft that would be even be great for a party favor or activity.
Punch a smaller hole ( I used Stampin' Up!'s half inch circle punch) in a little ways from the edge first.  Then, take a larger punch ( I used Stampin' Up!'s 1 1/4" circle punch) and punch so that you have a thin edge from the first circle, but not so thin that it could rip.  Repeat this process with Designer Series Paper, using the cardboard one as a template. Decorate if desired. ( I sponged the edges) Now you could either coat with Crystal Effects or heat emboss with clear embossing powder to seal.  Place a 5mm jump ring through the top and an earring hoop through that.  Voila!  Designer Paper Earrings! 
I hope enjoyed our Tour.  Come back for even more great ideas soon and as always, I appreciate your comments!