RemARKable Holiday Madness Blog Tour - Day 2

10:00 PM Edit This 4 Comments »
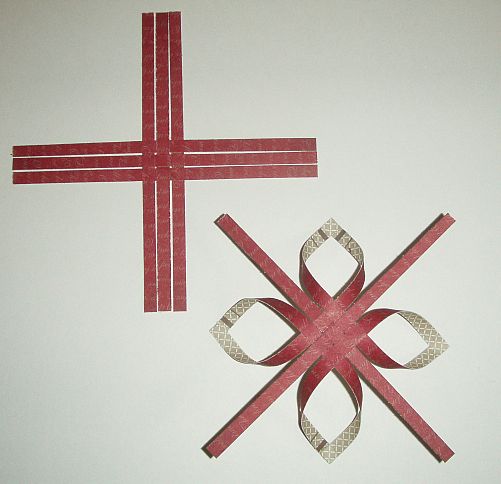
Welcome back to the tour!  Thank you for visiting me - I hope you're enjoying all the great ideas we have to share.  Today I have an ornament that's fun to make.  It takes 12 quarter inch strips of paper, preferrably with different sides, six inches long.  I used the Deck the Halls designer paper in the Holiday Mini Catalog - love this paper!

This would be great as a package topper as well and the size can be adjusted.  Want to know how to make it?  Of course you do - here goes:
Weave 6 strips and glue down as shown and repeat with remaining 6 strips.  Adhere the tips of the top left and left top around the back to make a loop.  Repeat on other sides.  Once you have two of the lower right image you'll rotate one and put them together back to back - or front to back, whatever way you prefer.  Weave straight ends through and glue to connect.  Trim off anything that sticks out.  You're done!  I did add a little extra to mine, though.  I sprayed it all over with Frost White Shimer Paint mixed with alcohol.  Smooch spritz would look great too.  Pretty!

RemARKable Holiday Madness Blog Tour

10:00 PM Edit This 3 Comments »
Welcome to the Remarkables Holiday Blog Tour!
I am sure you'll enjoy all the great ideas we have in store for you - all week long!
I'm going to start with a card.  I love to send and recieve Christmas cards.  Sometimes it's the only time of the year I hear from people - maybe even get a photo, so I always look forward to that.  Here's one I did with the Christmas Postcard stamp in the Holiday Mini.  I colored it in with a blender pen and the following inks:  Cherry Cobbler, Always Artichoke, So Saffron, and Garden Green.  It's layered on a Top Note Die cut in Cherry Cobbler and then layered on an embossed Always Artichoke base (Vintage Wallpaper embossing folder).  This is a great card for mass producing and mailing, since it is "flat".  I love these colors together and most of you know I love my Big Shot, so I'm happy to die cut and emboss. Hope you like it too!


Halloween Treats

4:16 PM Edit This 3 Comments »
Aren't these cute?  I figured I better show you something for Halloween before all the Christmas stuff.  I'm participating in a Holiday Blog Hop starting the 26th - so make sure to come back for that.
In the meantime, these are 1X8 clear bags filled with M&M's and an easy topper.  Batty for You is a great set to layer with punches and super fast.  Order your set now to get ready for your trick or treaters. : )

Friends Never Fade

4:40 PM Edit This 3 Comments »
Here's my favorite card from stamp camp last night.  There's so many great ways to use this set with the coordinating Greenhouse Gala Designer paper.  Love the colors too - new Daffodil Delight, Pear Pizzazz, Real Red, Choc. Chip.

Happy New School Year!

12:44 PM Edit This 0 Comments »
I hope everyone had a great summer.  I did, but with the kids undertoe 24/7, it didn't give me a lot of time to do my own thing and stamp.  I'm getting back in the swing and saw a card I just had to CASE on the demo website by Doris Denman.  I had just come up with 4 cards with the Friends Never Fade set for my class Friday night and then I saw this great idea with a great color combo (from the awesome new Color Coach!).
As usual, it looks better in person, but isn't it striking?  The colors are Concord Crush, Melon Mambo and Pear Pizzazz.  The flower is embossed and cut out on shimmer paper and colored with the blender pen , then attached on top of the stamped image.  The cute little flowers under the image are from the Hostess Set Because I Care.  So pretty!

Owl Punch and New Ribbon!

4:12 PM Edit This 0 Comments »
Hello!  Sorry it's been a while, life is busy!  I wanted to share this card with you since I really like how it turned out.  It uses a lot of new items  - new Owl Punch (a must have!), Cherry Cobbler card stock, Love Letter DSP (vest), Crochet Trim and 1/8" taffeta ribbon.  Isn't it cute? Actually the only stamping on it is the hello that I just markered from the hello baby stamp in Teeny Tiny Wishes.  Enjoy!